
This guide is for users who choose Amazon SES as their email provider. Maillayer also supports SendGrid and Mailgun — you can configure these directly in the dashboard.
Why Amazon SES?
- Pay only for what you send (~$0.10 per 1,000 emails)
- High deliverability rates
- Built-in bounce and complaint handling
- Scales to millions of emails
Prerequisites
- An AWS account (create one here)
- Access to AWS IAM console
Video Guide
Follow along with this step-by-step tutorial:
Step 1: Create an IAM User
- Log into the AWS Console
- Go to IAM (Identity and Access Management)
- Click Users in the sidebar
- Click Create user
- Enter a name like
maillayer-ses - Click Next
Step 2: Set Permissions
- Select Attach policies directly
- Search for and select these policies:
AmazonSESFullAccess— For sending emailsAmazonSNSFullAccess— For bounce/complaint notifications
- Click Next, then Create user
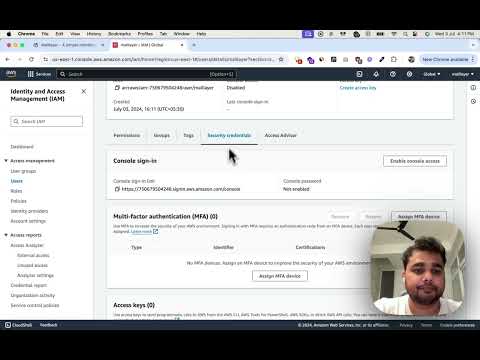
Step 3: Generate Access Keys
- Click on your newly created user
- Go to the Security credentials tab
- Under Access keys, click Create access key
- Select Application running outside AWS
- Click Next, then Create access key
- Important: Copy both the Access Key ID and Secret Access Key — you won't see the secret again!
Step 4: Add to Maillayer
- Open your Maillayer dashboard
- Go to Settings → AWS Configuration
- Paste your credentials:
- Access Key ID:
AKIA... - Secret Access Key:
wJalrXUtnFE... - Region: Select your SES region (e.g.,
us-east-1)
- Access Key ID:
- Click Save
Step 5: Verify Your Domain
Before sending emails, you need to verify your sending domain:
- In Maillayer, go to Settings → Domains
- Add your domain (e.g.,
yourdomain.com) - Add the DNS records shown to your domain registrar
- Wait for verification (usually 5-10 minutes)
Troubleshooting
"Access Denied" error
- Verify the IAM user has
AmazonSESFullAccesspolicy attached - Check the region matches between your credentials and SES setup
Can't send emails
- You're likely in sandbox mode — see Applying for Production Access
Bounce notifications not working
- Ensure
AmazonSNSFullAccesspolicy is attached to your IAM user
Next: Apply for Production Access to remove sandbox sending limits